Getting Started
Adaptive Equipment in Equine-Assisted Programs
The best adaptive gear does its job and then disappears. Here is what each piece — from mounting ramps to loop reins to safety stirrups — actually does, and why good programs use as little of it as possible.
Adaptive equipment in equine-assisted programs is the gear that makes participation safer, more comfortable, and more accessible for people with different bodies, movement patterns, and communication styles — mounting ramps and lifts, specialized saddles and pads, safety stirrups, adapted reins, supports, and communication tools.
The single most important “equipment,” though, is still a calm, well-trained horse and a skilled team. The gear comes afterward, and only as much of it as the moment calls for.
This guide walks through the common types of adaptive equipment and how they fit into a typical program. It is educational only and not a substitute for professional, medical, or mental-health advice. Many of the tack terms below — surcingle, cantle, pommel, tapadero — are defined in the equine therapy glossary if any are new.
Common Adaptive Equipment at a Glance
Here is the quick version before the detail. Most programs draw on some mix of these, matched to the individual rider and horse.
| Equipment | What it helps with |
|---|---|
| Mounting blocks, ramps, lifts | Getting on and off safely, with less strain on the rider’s joints and the horse’s back |
| Certified helmet and clothing | Head protection plus stable footing and comfort while mounted |
| Saddles, pads, surcingles | Balancing rider support with the horse’s comfort; a surcingle adds handholds and flexible positioning |
| Adapted stirrups | Stable, quick-release foot support and pressure relief for knees and hips |
| Reins, handholds, grip aids | A secure, manageable hold matched to grip strength and communication goals |
| Trunk and pelvic supports | A gentle cue toward centered, upright posture — never restraint |
| Communication and sensory tools | Visual cues, picture cards, and textured surfaces that clarify tasks and support regulation |
| Ground and driving gear | Halters, long leads, cones, and carriage harnesses for non-mounted or driving programs |
How to Think About Adaptive Equipment
Good programs follow a simple principle: use the least support needed for safety and participation, and reduce it as skills develop. Adaptive equipment is not there to hold someone in place or “fix” their body. It should leave room to move, breathe, and communicate while providing just enough structure for the task at hand.
Every strap, buckle, or support should be easy to check and quick to release, and fit matters for both the person and the horse. A saddle that looks secure but pinches the horse’s withers, or a helmet that wobbles and slides, creates problems rather than solving them. Staff continually adjust, observe, and refine, using the comfort of both horse and rider as their guide.
Mounting and Dismounting: Blocks, Ramps, and Lifts
Getting on and off the horse is often where adaptive equipment is most visible. Many riders use mounting blocks or ramps to step across a shorter distance, easing strain on their joints and the horse’s back. Some centers also use mechanical or hydraulic lifts so participants who cannot step or stand on a block can still mount safely.
The process is usually slow and predictable. Staff explain each step, confirm everyone is ready, and move in a coordinated way; the horse is positioned carefully, held by an experienced leader, and given a moment to settle under the rider’s weight. Dismounting gets the same calm structure, often with a pause at the end so breath, heart rate, and attention can return to baseline before stepping down.
Helmets, Clothing, and Basic Safety
In most programs, a certified riding helmet is non-negotiable whenever someone is mounted. A good fit sits level, touches all the way around, and has a snug chin strap that does not dig in; staff may do a gentle “wiggle test” to confirm it does not slide forward or tip back.
Closed-toe shoes with a small heel keep feet stable in the stirrups, long pants prevent rubbing at the knee and inner thigh, and layers let riders adapt to changing temperatures in the barn or arena. Gloves can help riders who grip tightly, have sensitive skin, or use reins with special textures or markers. These simple choices set the foundation for comfort before any specialized tack appears.
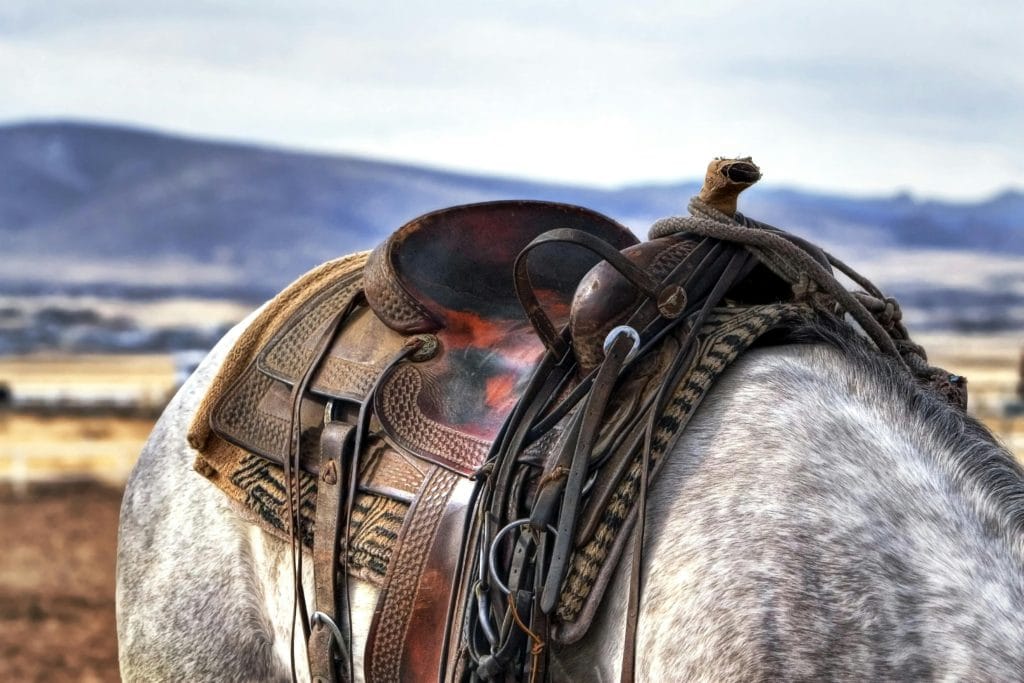
Saddles, Pads, and Surcingles
Saddles and pads are chosen to balance rider support with horse comfort. Many centers keep a mix of English and western saddles: a western saddle offers a roomy, supportive seat and a horn that can serve certain balance tasks, while an English saddle allows closer feel of the horse’s movement, useful when fine-tuning alignment and posture. Some programs use adaptive saddles with higher backs or extended pommels that give temporary trunk and pelvic support while someone learns to sit upright — features that should gently cue alignment, not lock the rider in place.
Under the saddle, therapy pads, foam liners, or sheepskin covers distribute pressure and reduce friction on the horse’s back. When the goal is maximum feel of the horse’s movement, therapists may use a broad pad with a surcingle — a wide band around the horse’s barrel with built-in handholds — which allows flexible positioning such as side-sitting or forward lean while still giving the rider a centered place to rest their hands.
One safety point is consistent across high-quality programs: riders are never strapped to the horse. Belts, ties, or any device that would prevent a quick dismount in an emergency is avoided. The goal is safe support, not restraint.
Stirrups and Foot Support
Foot position has a quiet but powerful influence on balance, hip comfort, and confidence, so the adaptations here are often small but significant. Safety stirrups are designed to release the foot quickly if a rider loses balance, and caged or tapadero stirrups have a covered front that keeps the foot from sliding too far through. Others use wider treads, offset designs, or flexible joints to reduce pressure on knees and hips, while toe stoppers give a dependable “end point” so the foot does not push too far forward — useful for riders with limited ankle motion or muscle tone.
Many participants start without stirrups at all, focusing first on trunk alignment and pelvic movement, and add them later when balance improves and they genuinely support rather than distract from the work.
Reins, Handholds, and Grip Aids
Hands reveal a lot about how a rider is feeling and how hard they are working, so reins and handholds are matched to grip strength, coordination, and communication goals. A grab strap on the front of the saddle or a handle on a surcingle offers a secure place for a light hold, while loop or ladder reins provide several fixed hand positions that help riders find even contact on both sides. Some reins are color-banded — “hold the blue sections” — to make instructions concrete.
Foam covers or textured sleeves reduce the effort needed to maintain contact, and elastic inserts soften abrupt pulls so the feel is more forgiving for both horse and rider. When working from the ground, the primary lead rope stays with the experienced horse leader, and the participant may use a secondary lead to practice cues in a way that is safe for everyone.
Trunk and Pelvic Supports
Some riders need an extra nudge toward center, especially early on. Programs may use small blocks, wedges, or bolsters in front of or beside the pelvis to encourage alignment, and higher cantles or temporary back panels can offer gentle contact behind the seat to signal where “tall and centered” lives. In some clinical contexts, a rider might briefly use side-sitting or other positions on a wide pad to wake up different muscle groups and change how the body receives the horse’s movement, always with safety and comfort monitored continuously.
The general rule: if a support starts doing the work instead of just pointing the body in the right direction, it is time to step it down.
Communication and Sensory Tools
Not all adaptations are physical. Communication and sensory tools help riders understand what is being asked and stay within a workable range of arousal. Visual supports might include cones, colored rings, or arena letters marking where to turn or stop, while picture cards or a short written sequence can outline the steps of grooming or mounting. For some participants, consistent verbal cues or rhythmic counting help organize breath and timing.
Textured pads, reins, or grab straps provide steady tactile feedback without irritating skin, and in some settings, speech devices or switches may be used from the ground during equine-assisted learning or psychotherapy. Whenever equipment like this is present, staff take extra care with cords, hard edges, and proximity to the horse’s body.
Equipment for Ground-Based Programs
Equine-assisted learning and equine-facilitated psychotherapy often stay on the ground, where the “equipment” is largely about layout and boundaries. Halters and long lead ropes allow clear communication, while cones, poles, or simple obstacles create task structure. Facilitators plan traffic flow so there is space between horses and participants and so anyone can step out to a safe zone for a break. Sturdy, closed-toe shoes and gloves protect feet and hands during leading exercises. The aim is a setting that feels contained, predictable, and respectful of both human and horse comfort.
Driving and Alternatives to Riding
Mounted work is not always the best or safest option. Some participants are better served by carriage driving, sitting in a cart and directing the horse with reins and voice; adaptive seats, vehicle-specific lap belts, and carefully fitted harnesses keep both person and horse secure while still allowing freedom of movement. Driving delivers rhythmic movement and real responsibility without the pelvic motion of riding.
For others, entirely unmounted programs offer rich experiences through grooming, leading, and observation alone, where adaptive equipment may be as simple as easier-to-hold brushes, step-free access to grooming areas, or well-placed benches for rest.
Fit Principles That Protect Horses and People
Every piece of equipment touches two beings, and programs watch both. On the human side, staff look for red marks or rubbing after a session and adjust clothing, padding, or time as needed. On the horse side, they watch for soreness at the withers or back, uneven sweat marks, skin irritation under girths, and changes in movement.
Session length and rider weight are matched to the horse’s fitness and conformation, saddles are checked for spine clearance and even contact, and pads are kept clean and replaced when worn. Buckles, stitching, and straps are inspected regularly, with tired gear retired before it becomes a problem.
What You Should See in a Good Setup
From the sidelines, a well-run program looks calm and methodical. Preparation is unrushed, helmets are adjusted gently rather than shoved into place, and stirrups are set thoughtfully rather than guessed. The horse stands quietly, with soft eyes and relaxed posture, and gets a moment to adjust to any new tack or positioning.
Staff explain what they are doing in simple language and invite questions, and during the first few minutes of movement they watch closely: does the rider look comfortable, can they breathe and move freely, and does the horse keep stepping forward with ease? Small tweaks happen on the spot when needed. Our guides to choosing an equine therapy center and what to expect at a riding session describe more of what a strong setup looks like in practice.
How Adaptive Equipment Fades Over Time
One quiet sign of progress is the gradual fading of equipment. A rider might begin with a high-backed saddle, a grab strap, and loop reins, and months later be in a flatter saddle with standard reins and only occasional use of a handhold. A caged stirrup might give way to a simpler safety stirrup, and extra trunk supports may be reduced or removed as balance improves. This is part of the broader progression through a program over time.
The goal is never to rush away from support, but to follow the rider’s readiness — and as independence grows, the horse’s comfort stays just as central as the person’s. The best adaptive equipment always points toward more freedom and choice for both partners, and a shared experience that stays calm, respectful, and enjoyable. When you are ready to find a program, you can browse centers by state in our directory.